Building your Custom Connector on Google Data Studio

Building your Custom Connector on Google Data Studio

Disclaimer – This is going to be a slightly technical post. If code scares you, then I’d suggest you skip this one. However, if data excites you, read on fellow adventurer!

When Google launched Google Data Studio, I had written an in-depth post about how one can create dashboards in Data Studio and some of the easy to use dashboard templates that Data Studio has to offer. As the product evolved, one of the most powerful features that this product had to offer was the ability to create custom data connectors to your own datasets.

What does a custom connector do?

A custom connector enables a user to access their own data source within Google Data Studio. Let’s take an example of a marketing research associate who wants to present her findings. One approach she could use would be to put all that data in Google Sheets, and then use one of the in-built connectors.

However, what would she do if her data set was large and does not fit in Google Sheet or Excel? Or if her data set included multiple surveys which are inter-related to each other?

What if this data was in a database, or available as an API? This is where the custom connector for Google Data Studio works.

I wrote my first connector a year back, and I had to do some digging around. I thought that I should pen down my notes so that more people can do this much more easily. Here are my notes for the same.

Building a custom connector

Before you jump into the implementation bit, know that this is based in JavaScript and you need to be comfortable with Google App Scripts. It’s okay if you do not know this, but JavaScript is a must.

Google has official documentation on the developer site of how to build a Community Connector, this is a pretty good resource to start. It has a step by step video and instruction guide as well.

Let’s look into what makes different parts of a connector, here is a link to a sample connector code on Github.

Community Connector sections

Each community connector is a separate Google Apps script that you deploy using Google App scripts. The connector is in itself made of the following sections –

  • Configuration section – This is to flesh out all the meta information about the community connector. Use this section to take any inputs from the user e.g API Secret and key if you don’t wish to store this in your code.
  • Authentication section – This is to authorize the app script. If your data is lying behind a secure mechanism, then use this section to authorize the script to access the data. This supports OAuth2 as well.
  • Schema section – This is used to define the structure to the data you are importing into Data Studio. Use this section to outline which fields and what data types are they. You can also add more information on what kind of aggregation do you want this field to be have (Sum, Average, Min, Max, etc).
  • Data section – This section is used to fetch the data that you are importing. Use this section for data validations or if you want to do any last minute data tweaks (e.g date conversions from string to date).

That’s all there is to it. Now, let us get into the actual flow of the script.

Connector code flow

When you are writing your connector, be sure to go through the developer reference first. In your script, you will have to include the following functions –

  1. getConfig() – this returns the configurable user options for the connector, this will be shown to the user when the user is adding the connector to their Google Data Studio accounts.
  2. getAuthType() – this is the function which is used to check if any authentication is required. If OAuth is set, then the community connector interface would check for the OAuth details
  3. getSchema() – this returns the schema of the data that is being access, this will be shown to the user when the data is being explored (where we can see the dimensions and metrics).
  4. getData() – this is the function which is used to access the data, the data format that is expected is outlined here. Normally, it is advised that the programmer write a separate function for fetching the data, a post processing function for setting up the return values, and finally call those in the correct order in this function.

Do note, that these functions will be called in the same order as they are listed. As long as you have these functions in your code, you have a functioning connector. Once you have this, you will have to deploy the code.

That’s it. Now, add this community connector to your Google Data Studio account, and make the reports you want to!
AMP and Advertising

Mobile Content

This blog is a modest small-tier blog. It does not get too much traffic (much to my chagrin) and therefore expecting the blog to monetize is too much. However, I have steadily written my thoughts and opinions on this … for the past 7-8 years now.

Looking at such a long time range allows me to study how blogging and blog monhersetization has changed over the years. Especially now with mobile form factors being the main devices that users tend to consume content with.

Continue reading “AMP and Advertising”

Are we over zealous on Remarketing?

One of the major shifts in online advertising that I have observed recently is the rampant use of re-marketing campaigns of late.

What are remarketing campaigns?

I like to think of remarketing campaigns in the form of a popular ad campaign that Vodafone (then Hutch) ran in India.

Where you go our network follows
Where you go our network follows Ad by Hutch

This brilliant ad campaign that was run in India talks about how the network follows the user and ensures that the telephone network is always available to the end customer. Keep in mind those were the days when network connectivity was a major issue.

Re-marketing campaigns are very similar, instead of the network, its the ad network that follows and ensures that the user is targetting off different websites who are running ad inventory.

If done right, remarketing campaigns can be seen as a serendipitous, even.

For example, let’s say if I went to a Flipkart or Amazon to purchase a particular product, and then I added the product to my cart, because of that particular action, I could be included in a Remarketing audience, and this audience is then shown an ad across different Display Networks. One of the most popular display networks out there is the Google Display Network (GDN).

However, this is not the only display network, there are multiple networks out there who can provide the same facility to the marketer.

It’s all about the spends for Display Networks

Now, you have to realize that for all Display networks and even for Social Media sites, the primary revenue model is advertising. That means, they want to grab more and more wallet share of the brand. A few years back, Google was ruling the roost in India, however, Facebook is now giving Google AdWords a run for its money.

Therefore, whenever a new feature is available on one network, the other ad networks simply duplicate the feature. Did you know that at present if you wanted to run Remarketing campaigns you could do so Facebook, Google, LinkedIn, Twitter, Instagram and YouTube? The list goes on, and the ability to create Custom Audiences and Lookalike audiences is also available across all channels.

Simply put, all the old and new marketing networks out there are willing to provide the features that marketers need in order to target (and re-target) their customers.

So where does that leave us?

Over zealous re-marketing

It leaves us with a whole bunch of over zealous marketers who want to get in front of the user and keep bombarding him/her with their offers. No matter what.

Take this case, I recently visited a website that was being promoted by a known agency. I was doing a routine check of their tag implementation. Satisfied that most of the obvious issues were taken care of, I left the site. Notice, there was no purchase intent.

Now, everywhere I go, I am being bombarded with impressions of this site. On Instagram, on Facebook, on GDN. Cute, but am I going to click on the ad? Not really. Are these impressions wasted? Yes, on me, they are.

I never intended to buy!

Is such a bombarding of the user the only mechanism to deliver results?

So what can be done to make remarketing more effective?

As a marketer who is in charge of running these remarketing campaigns, there are a couple of things that you could immediately do to reduce the spends and therefore increase the efficacy of your campaigns.

  1. Put a frequency cap on each of your creatives. If I am not going to click on your ad the last 20 times, theres a snowflake’s chance in hell that I will click on the ad the 21st time!
  2. Create remarketing campaigns based on user actions on the site, and not just a blatant site visit. If I have done certain things on the site that indicates my intent e.g start filling a form, downloaded a brochure, done an add to cart, etc, then it makes sense for me to be included in the respective remarketing list.
  3. Exclude the users who have already converted from your remarketing lists. If you do not do this, then the ads would also be shown to users who have already converted. Thereby wasting a lot of impressions. If you don’t do this, then its just plain lazy.
  4. Plan your remarketing campaigns on paper first before, think through the entire process and then kick-off the campaigns. Most of the time, remarketing campaigns are launched after the firsst set of campaigns, since you need visitors to be included in your remarketing lists. That means, you have time to plan and think through. Don’t waste that time.

If after all this, your remarketing campaigns still don’t deliver results, do let me know!

After thought on Remarketing campaigns

In the day and age where individuals online are slow to wake up to concept of online privacy, we as marketers often don’t realize that remarketing campaigns being done to death can turn a meeting of chance into oh-my-god-the-brand-is-stalking-me kind of feeling.

The next time you are thinking of remarketing, do tone it down a bit please.


Google launches Machine Learning for AdSense

Google AdSense has been around for more than a decade and a half now, this along with DoubleClick for Publishers allows website owners to monetize their traffic.

One of the key challenges in this was to figure out the optimum ad placements without impacting readability and user experience of the site. This trade-off that the publisher had to do was to decide on the different ad slots to create on the web page, and then balance that with the Revenue Per Thousand Impressions (RPM) metric that the digital advertising industry is so familiar with.

In order to help publishers out, AdSense had experiments where you could test different ad layouts and figure out the best layout to monetize the site.

So what has changed now?

Machine Learning.

This is the applications of artificial intelligence which gives programs the ability to discover new rules and learn from experience without additional programming. So that means, for newbie publishers instead of having to figure out by themselves what ad formats work and what ad placements work for them, you can apply machine learning and let the platform learn on its own.

What that means, is that the publisher is now free to focus on content, and let the AdSense platform figure out the best way to monetize that content on the ad network.

Caveat Emptor

With every new feature, comes a series of disclaimers. Machine Learning requires a lot of data to get things right. If you are a small site such as this blog, then it will take a long time for AdSense to optimally figure out the right ad formats and the proper ad placements.

Having said that, here’s a very simple way using which you can get started with Auto Ads in AdSense.

Setting up Auto Ads

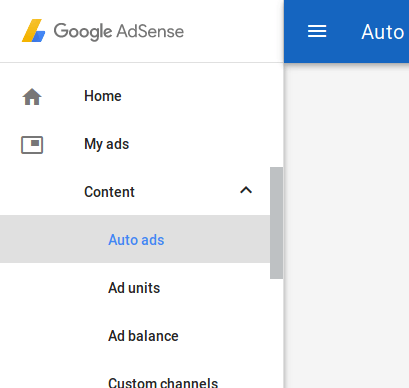
Auto Ads in AdSense
Auto Ads in AdSense

In your AdSense console, in the Ads section you will now find a Auto ads menu item. Click on this, and get started with the setup wizard that’s present there. If you want to know how to embed the Auto ads code in your site, Google also has a helpful support article here.

That’s it! Once the code is setup in your website, you choose the formats you want to add (I chose everything) and let it run.

So far, the results haven’t been that great. However, time will tell if applying machine learning gives great benefits for the publisher.

What benefits should one look at?

Ultimately, it boils down to increasing the aggregate Revenues per thousand impressions metric (RPM). That’s what I’d look at, I would also look at the Click through Rates (CTRs) to go up.

Webmaster rolls out new Search Console

New-Search-Console

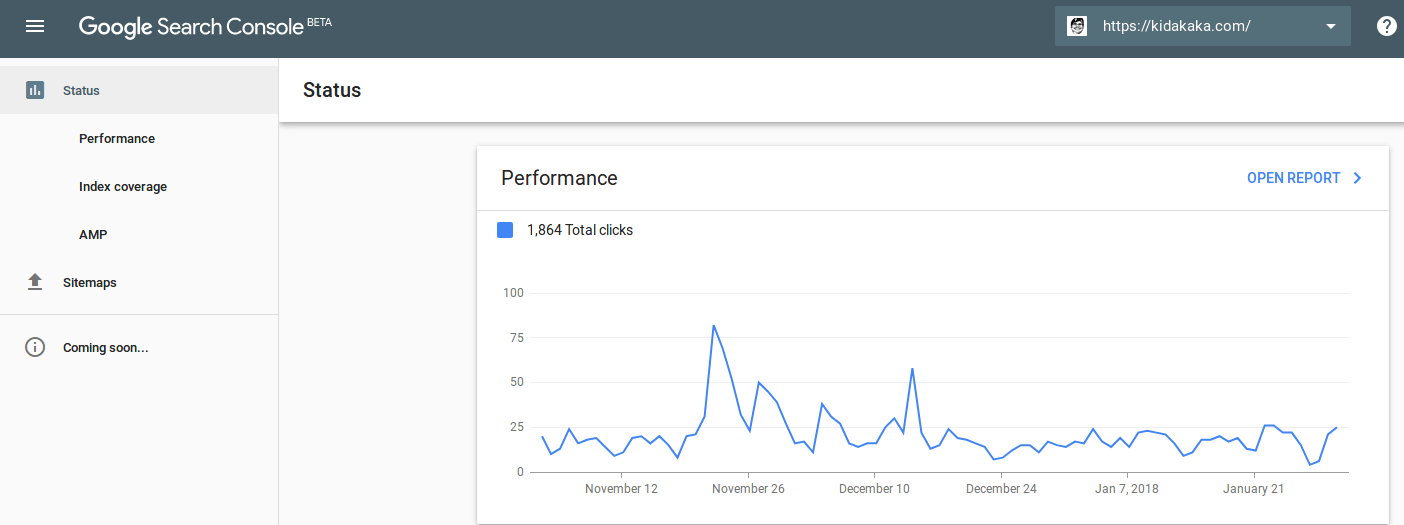
This has been coming for quite some time. Google Webmaster is slowly rolling out an update to the Search Console. The new search console is a much cleaner interface with most of the reports and insights hidden under multiple layers.

The Dashboard

The new Search Console dashboard is much more simpler now, with just three reports that you can view –

  1. Performance – How your site is performing in the search results. This is similar to the Search Analytics report.
  2. Index Coverage – How your site has been indexed and what errors does the search engine detect on the site
  3. AMP – Information about the Accelerated Mobile Pages and how Google detects AMP on your site

The good things

Straight off the cuff, this tool provides just the right information to the user. It forces the user to engage with the reports available, and provides interesting insights that were not available before.

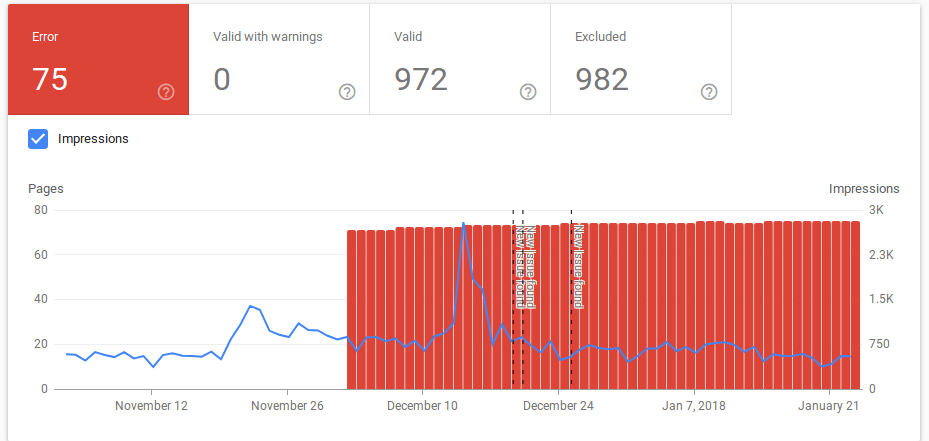
Take a look at this new report which tells me the impact on Search Impressions when I decided to mark 75 odd pages on noindex.

Index Coverage Reports Insight
The report shows how I have lost impressions because of adding noindex to pages

Overall, most reports even if being the same are now much more easier to understand and interpret.

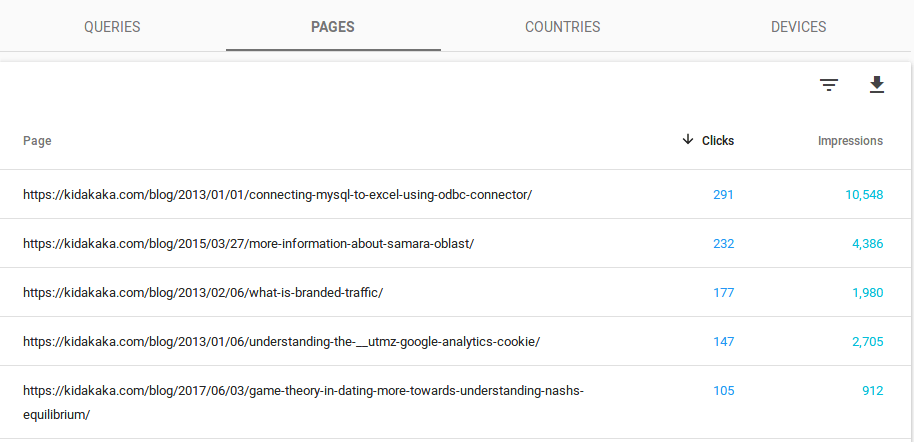
Another example is the Performance report with the Pages section selected. This feature was available in the older interface as well, but now the data is much more clear and this tells me which pages should I work on to improve my CTRs.

Search Analytics Report
I need to tweak the description and meta details of some of the top pages

The bad things

There are more things yet to come, and this is not a complete experience yet. I cannot only rely on the new interface. Some reports simply haven’t been incorporated into the new Search Console yet.

Reports on Structured Data is completely missing. The diagnostic set of tools and the crawl request tools are not included in the tool.

The update to the search console is welcome and I for one am glad that a much more cleaner interface is made available.

Using Intelligence reports in Google Analytics

It’s always a pleasure to use a product that keeps evolving. The possibility of discovering a new feature that’s been recently launched, and the happiness of seeing the applications of that new feature is what keeps me coming back to the product. Google Analytics is one such product for me. Slowly and steadily, they have evolved the product so as to give the free tier users a taste of what Google Analytics Premium (GAP) offers.

Intelligence reports have been around for quite some time now. However, what GA has done in the recent times, is give the user the ability to articulate their question in natural language, and use natural language parsing to understand the question and present meaningful answers back to the user.

Smart and Intelligent reports

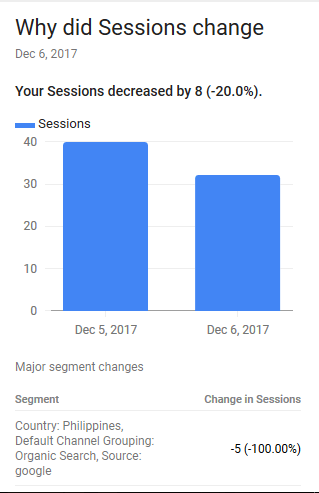
Here’s an example of how these intelligent reports work. Suppose, I see a spike in traffic yesterday, and I want to know the reason why.

Normally, I would go to the Source/Medium report in the Acquisition section and see which of the sources have had an increase in traffic since yesterday. However, what intelligent reports does is this –

Intelligence Reports in Google Analytics

So what’s the big deal?

The big deal is this. If you are not comfortable with the analytics interface or are not savvy with using the right set of reports for fetching your data, then the intelligent reports are a rather user friendly way for getting access to perhaps the right data.

Notice, in my example, the segments that intelligent reports ended up reporting was a rather advanced segment (Organic traffic, Country-wise).

To reach there, I’d have to go through atleast two separate iterations. This was given to me rather quickly.

Cool, are there any disadvantages?

There is one huge disadvantage. The data given is prescriptive in nature.

You are relying on Google Analytics to give you the right data.

While, for most use cases, the data may not be that important, but for someone whose living runs on getting the right numbers, this may not be enough. It’s good enough to get you started in the right direction though.

Why do I still like it?

The nature of querying is also pretty great. Now, business teams can directly dive into Google Analytics instead of having to wait for an agency or an analyst to make sense of this data. That’s power to the people!

This means, a lot more people can now engage with analytics and take the right data driven steps for improvement.

18 months down the line, what has Google AMP really achieved

In early 2016, Google launched Accelerated Mobile Pages (AMP) for publishers who wanted to have their content loaded in a flash on mobile devices at a much faster rate.

At the point of writing this article, 65% of all traffic in Asia (and this is higher for developer countries) is on the mobile. A bulk of these users are on mobile data networks which may not be as fast as a steady broadband connection.

What Google did therefore was to launch a series of initiatives, Weblight and now AMP that would help the search engine load the publisher’s content faster for the user.

Google is focusing on the user

The rationale that Google gave to publishers was that it focused on the user’s experience. If a user is doing a Google search on a choppy data connection, the search results might be presented in the blink of an eye, however, because the publisher’s site was taking too long to load, the user would get a bad experience … or worse, the user would say that Google is too slow!

With Google Weblight, what the organization did was to load the content on an interim site (which was Weblight) and display the content there. This created two problems –

  1. Publishers lost traffic, and Ad Revenues
  2. Publishers lost control on the format of their content and their style guides

Both reasons were strong enough for a lot of publishers to stay away from Weblight.

AMP gets introduced in the mix

To give some control of the content formats back to the user and also to incorporate both analytics and ad scripts into the publisher’s content, Google created another mark-up language. This is AMP.

AMP allows the publisher to present the content on their own site, in a style that’s acceptable to the publisher. It may not have too much flexibility, but at least the publisher is free to design that style instead of the Weblight approach.

This may not be an ideal situation, but atleast it ensures that users are shown the content they are search for the fastest.

Have people embraced AMP?

Well, it’s a bit hazy there. For those of us who were on existing Content Management Systems (CMS) such as WordPress or Joomla it was much easier to transition. It just meant having to install some plugins and do the configuration.

However, the folks who have made their own web apps and products, they are completely clueless as to how to go about implementing AMP.

The sad part is that a lot of the product developers that I have spoken to, are of the opinion that AMP is just a new thing that “SEO folks” have to do. Add to the mental model of SEO being perceived as a much lower the value chain task – that pretty much means that developers are simply not aware about the benefits of AMP.

What irks me is that people’s individual bias is used to mask their ignorance about how to make their products perform better on search.

So, if you are leading a product team or are working on building products, then definitely head on to the Accelerated Mobile Pages project.

As a publisher who has embraced AMP, how does that impact me?

It surprisingly does not help me much with acquiring more traffic. The website is shown a bit differently in the search engine results, and that perhaps is getting me a bit higher click through rates. However, the numbers are not significantly high enough for me to assess based on the data provided.

One major problem with all new initiatives that Google is doing with Search is their stubbornness on keeping things completely opaque.

Not a single publisher is in the loop when it comes to knowing what was the exact payoff of any of the optimization activities they did. It is left for these teams to dig in and figure it out themselves before they are able to attribute the success of this activity. I believe that’s a major deterrent for a lot of product managers to make this choice of embracing AMP.

The web is not Google

I am coming back to this post after 6 months, found this on the internet – the AMP Letter. This is pretty much what I wanted to say about how this is shaping up.