Nitropack review

Those of you who are running some sort of a content management system (CMS) for your websites would be familiar with the problem of improving the site loading speed through different methods. From the age old caching methods of using op cache module, to using an application specific caching method such as WP-Supercache for your WordPress installations, the sheer variety of solutions out there is a lot.

For a non-tech webmaster (these days, this term seems like a conundrum!), it becomes difficult to choose. At the end of the day, what one ends up going for is how fast the website is loading and more importantly how is the web performance of the site.

Let’s take a look at what are some of the common factors that any webmaster would like at for their caching solution.

Server site rendering time

This is effectively how fast is your server giving the response on the browser. Let’s say that you are running a blog on a small instance or a shared hosting solution. This would usually have limited resources associated with it, be it computing or memory. For instance, currently, these pages are being served off a 512 MB droplet.

Needless to say as your traffic increases, these limited resources are then not enough to address the entire traffic and thus, the response time for all your visitors starts to increase. A simple solution for these problems could be to bump up the hardware and increase the computing and memory being made available for the server. The computing speed is obvious, but why the memory you might ask? Well, since most web servers are softwares running on servers (for e.g Apache or Nginx are the servers most commonly used for WordPress), these software processes have to run on the server. The more the traffic, the more the number of processes.

If you are running WordPress and are facing a load of traffic, and if you are running your database on the same server, then you might sometimes be seeing images like the one below –
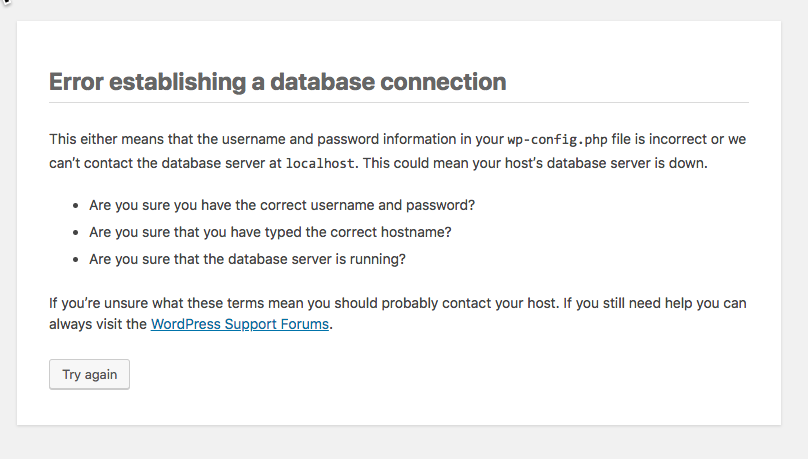
MySQL error with WordPress

Seems familiar? A common reason for this is when there are too many apache2 processes and not enough memory to handle all of them. The server promptly terminates the other processes, including the MySQL daemon.

Caching to the rescue

This is where server side caching comes to the rescue. Take this blog post for instance. How many times in the week am I going to edit this? Not many right?

In which case, instead of the PHP script executing every time, why can I not serve the static (HTML pre-rendered) version of this post?

WP-Supercache does a good job as a plugin to do this, however, in this case, for supercache to execute, the WordPress PHP scripts are still executing. How can we stop those?

Another option would be to run caching at Apache or Nginx’s level. This is a much better approach since instead of calling PHP scripts, the server will serve the last known cached static file. The problem with this approach is cache management and storage.

With a small server, you may not have a lot of storage, and if you have been maintaining a content heavy site, then caching all pages might be a storage intensive process. The expectation from your instance’s compute power also increases.

This is where you will find reverse proxy servers shining.

Reverse proxy servers

A reverse proxy server is a server that sits in front of the web servers and forwards client requests. One of the older versions for PHP based websites was Varnish. Nginx also offers this, and newer versions of Apache also do offer this functionality.

What the reverse proxy does is for each request, it caches the response from the down stream server and serves that response for each subsequent request. Think of it as a smart cache manager that sites seamlessly between your CMS and the user.

Traditionally, these were a bit difficult to setup, and therefore were the domain of only the tech oriented webmasters. However, of late, there have been a couple of smart SasS based reverse proxies, and that’s what I wanted to write about.

Cloud-based reverse proxies

A cloud based reverse proxy is a reverse proxy server that’s not on your network/server infrastructure, but rather hosted as a separate service that you choose to buy.

I had initially tried Cloudflare, but wasn’t really impressed with the results. There were a couple of Indian service providers as well, but the outcome wasn’t that great.

Then, one of my colleagues pointed me to Nitropack. Getting started with Nitropack was a breeze and I could easily set this up. There was also a plugin to be installed in my WordPress setup and that’s about it. Nitropack even had a CloudFlare integration (since I manage my DNS on CloudFlare), where it made the relevent DNS entries and I was able to use this without too much of a hassle.

I am currently on the free plan, but the immediate impact on my server response times, and my web performance has been substantial.

If you are a website owner and if you have been harangued with web performance issues, do give this solution a try. It makes a sufficient impact on your response times.

Google, GoDaddy and the HTTPS Conundrum

I like to stay active on this blog, and I love the constant tinkering on WordPress (right from identifying which plugins to install to customizing the theme).

This is one of the main reasons I am able to blog on a regularish basis. Obviously, since it’s a content driven site, the bulk of my traffic comes from Google Search.

So what’s wrong with that

The over dependence on organic search means for the blog to have more visitors, user engagement and comments – I have to try and follow the diktats of the market leader in Search. That’s Google.

I am a fan of most of Google’s work. However, the kind of hold they have on the search market means that publishers who want to be found on search have to work towards being search friendly. Google is all about Do No Evil, and I respect them for that. However, with the recent HTTPS update to their search algorithm, small time publishers are forced to relook at their hosting solutions.

GoDaddy and shared hosting

My site doesn’t get a lot of traffic, 2k-3k visitors a month. For that kind of traffic, a shared hosting plan is perfect. I have been using GoDaddy for quite some time now. Primarily, because most of my domains are within this account.

For the past 8 years or so, I have been using this account, I cannot complain about the service. I know it’s a shared hosting, and it has managed to meet my expectations.

Until now.

GoDaddy and HTTPS

The hosting plan I have is a simple plan and it does not support me having to install a custom SSL certificate. So much so that, even if I wanted to purchase a certificate from GoDaddy – I am not able to do so. Perhaps its a glitch in their interface.

I could get a Lets Encrypt certificate, and that’s what I have done for the 13 Llama Interactive site and for Harshaja’s blog. The problem with this approach is that both these sites are hosted on a DO instance. Where I can easily control the installation of the SSL certificate.

There is no simple option for doing that. GoDaddy support is of no use, and that leads me to a dead end.

Cloudflare can help

This is where a reverse proxy like Cloudflare helped. Atleast all the requests that are going to the site can be sent to an HTTPS version of the site. The lookup itself is done via Cloudflare and I have updated the website settings in my WordPress to serve from the HTTPS endpoint.

However, this kind of kills the wp-admin section. Thankfully through the REST API and Jetpack’s connection to WordPress.com I can still manage to post content.

So what can a publisher do?

At this juncture, I could simply shift my hosting and be done with it. It’s the easiest option. However, what about all those publishers out there who may not have such an option available to them.

There has to be a simpler solution to this mess.

Upgrading WordPress

With the WordPress 3.3 update coming out, I decided that it was about time that I upgrade the wordpress running on our company’s website from the lowly 2.7.1 to the current version. This has been a thorn in my side from quite some time (about a year now). I had earlier attempted to correct this, however direct update options available in WP always resulted in broken themes or worse, broken functionality. It’s a nightmare when you have to consider the SEO juice you would be loosing because of the change in URLs. Even if I put in 301 redirects, it was too much of an effort to consider the update.

Installation

  • Christmas and New Year is always a slow time for any business, the perfect time to update WordPress. Also, using Google Analytics, I noted the time of the day when we receive the least no. of visitors (2am to 7am IST, when the no. is around 300-400 visitors per hour, else it goes as high as 1700-2000 visitors per hour)
  • The first thing I did was ensure that my hosting environment was compatible with WP 3.3. Turns out that my PHP version was not updated. I found this excellent guide to upgrade PHP from 5.1 to 5.3.
  • Once that was done, I double checked to see if my existing packages were compatible with the updated PHP. Turns out, that a lot of the functions in the previous version were deprecated. My error_log was looking like a battlefield scarred with PHP Fatal Errors, and PHP Warnings. Some quick fixes, I was ready for the WP update.
  • Using the awesome 5-minute WP install, I installed a dummy version on a hidden subdomain. I was sure to disable search engines on this deployment.
  • I then exported all the data from our current system and imported it into this deployment. This was the easiest part!
  • I then copied our theme files, and installed it into this new WP package (you have to check the theme files for deprecated methods)
  • I then copied all the plug-ins from the old to the new WP. These were then updated. The good thing about updated plug-ins is that you get awesome set of functionalities and security updates that you so wanted. Note to New Webmasters: There are a lot of plug-ins out there whose older versions contain backdoors (more on this later), trigger false alarms on search engines, etc which need to be taken care of. Earlier I used to this clean-up using shell scripts, but not anymore :)
  • Now with a bit of tweaking here and there, the site had URLs which were function properly (no more worrying about loosing on our SEO efforts).
  • With adding a fair bit of plug-ins into the system, came a new problem – conflicting jQuery!! Earlier this month, I had asked our intern to hand script a jQuery menu, and that was conflicting with the other jQuery scripts. Fortunately, we have jQuery.noConflict().

A whole new World!

  • WordPress 3.3 is breathtakingly awesome!
  • The custom fields have been nerfed, now you have to do a fair bit of tweaking around to introduce custom fields in pages. But that allows me to have a higher controls on them. Earlier custom fields had this nagging way of getting out of control in a wordpress installation. Not any more!
  • Plug-ins like All-in-one-SEO make for better and simpler SEO efforts. All my worries of duplicate title tags are slowly vanishing away!
  • Better plug-in support! Earlier where I would myself script a small workflow on the WP installation, now I can again rely on the huge set of awesome wordpress plug-ins

The good part of this transition was that it took me a little of 3 hours to completely migrate. Of course for some other media (such as videos, pdfs, etc.) which I did not want to migrate to a new folder, I created softlinks and the task was done. All in all, if you are facing legacy wordpress systems, and are worried about upgrading them to the latest version … dont. The best method is to deploy a new version and migrate all the content (however ginormous the task sounds, its a better approach).