How to setup Microsoft Word to post to WordPress

For those bloggers who publish directly to WordPress, life has been good. Especially after the Gettysburg editor, users got a live site, rich text editor which just worked. The user experience is very much like the much loved Medium editor and for quite some time this was the default mode in which I used to publish. Not that I write frequently these days! In fact, this post is after an hiatus of more than a year! One pet peeve I have with the existing WordPress editor is that in the aim of making writing easy, a lot of the advanced options have been hidden. Somehow it ticks me off and I haven’t been able to write as much as I wanted to.

Perhaps it was writers block, or a busy schedule, or just being plain lazy. I have no excuses for this and in future will try and be much more regular. However, this post is not about my lack of writing, its about this cool feature that I recently found about in the MS Office suite. Microsoft Word has always been a major editor for most individuals (be it a student or a professional). Would it not be super cool if we can somehow directly publish to our blog from MS Word? Let’s find out how!

Step 1: Create a new document

Open your MS Word (as long as its higher than version 2007), and search for a new document type – blog post. You will find this in templates and more if you haven’t earlier done this. Once you find the template, you will notice that there is a Create button.
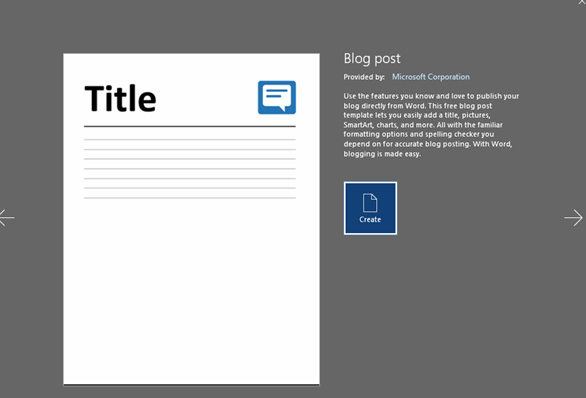
When you set this up, Office will prompt you to setup your blog. Click on Register Now. This is where its going to get a bit technical, but don’t panic.

Step 2: Register your blog
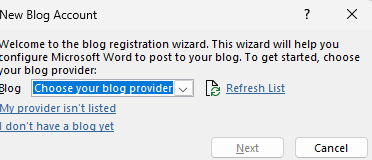
In this list, choose WordPress. Now, you need to know the URL of your self-hosted or WordPress.com website as well the username and password that you use.
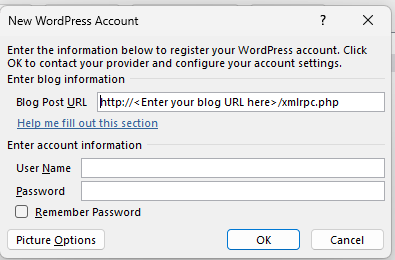
Add these details and make sure to click the Remember Password, else every time you try to publish to your WordPress site, you will be asked to key in the password.

Step 3: Write a draft

You are now done! Start writing your blog post, and once you are done, hit publish!

The post would then be submitted to your WordPress site with your credentials. That’s all there is to it.

Getting started with R

Back in 2017-18, I started teaching a course in a business school – instead of including a lot of theoretical frameworks, I opted to go with the basics and some implementation and tooling concepts. One of the tools that I chose to teach was how to use R in business analytics.

For those of you who do not know R, here is a helpful wiki article on the same.

Teaching what is broadly a scripting language to graduate students who havent written a single line of code is a humbling experience. You cannot take concepts such as variables, control loops, libraries as taken for granted since the exposure to these has been minimal. So how does one pack all that information into simple, usable instructions?

This is what I did.

Use free MOOCs

For students to understand the basic concepts of R – vectors, assignments, matrix, simple functions, etc, I prefer free MOOC such as the Introduction to R by Datacamp. The course is simple, it has the R ide within the practice area and allows for easy practice sessions and a playground to test your scripts while you are reading through the course material. I find this super useful for application oriented courses.

Right before jumping into the actual concepts of how R can be used for business analysis, this basic introduction course helps in establish a good solid base for participants who want to get started with R.

Use multiple datasets

I typically start these sessions with a financial data set. Credit card usage statistics, or some such information. However, I realized that students do better if they are able to relate to the date. During the length of the course, I found that switching to a course such as movie data (and thanks to IMDB for opening up their database) or cricket data made a lot more sense. It became easier for the participants to apply conceptual learning on the data sets.

See and Do

We used to incorporate several practice sessions in the class. This included getting the basics, writing scripts and getting started with R.

Some of the easier ways are –

  1. Use the R-Studio IDE installer
  2. Use the Anaconda Navigator
  3. Use an online tool like Rdrr

Connecting MySQL to Excel using ODBC Connector

We use vTiger CRM for capturing leads and general workflow management at Pristine. vTiger is by far one of the most feature rich and economical CRM solutions that are available in the market today. It lacks one thing though, a strong Reporting backbone, especially for the marketing department. So if you are running multiple campaigns across different mediums and capturing all these leads in vTiger using Webforms, then there are very few useful reports to find things such as Return on Investment (ROI) of all my marketing campaigns, or to find which campaign is working out on a day to day basis.

This is where we generally use Excel! I had written about one such report that we use to evaluate our daily and weekly campaign performance using Subtotals in Excel. You can of course pull data from vTiger in the form of a .CSV file and then run reports on it. However, if you have a local replica of the MySQL database of your CRM, then you can easily connect MySQL to Excel using Data Connections and MySQL ODBC Connector. Here are the steps on how you go about it –

  1. Obtain the MySQL ODBC Connector setup, select the appropriate version for you and install it
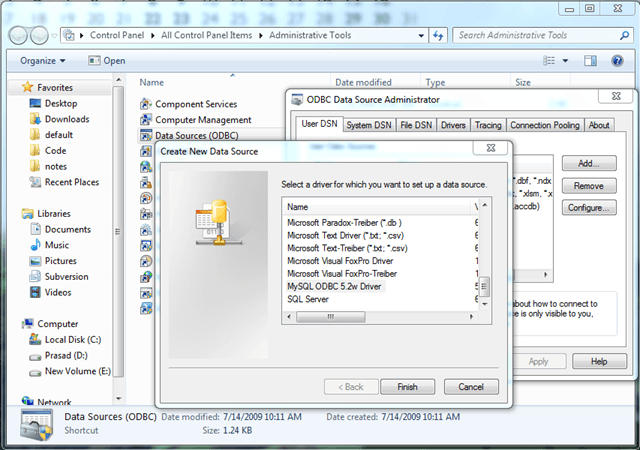
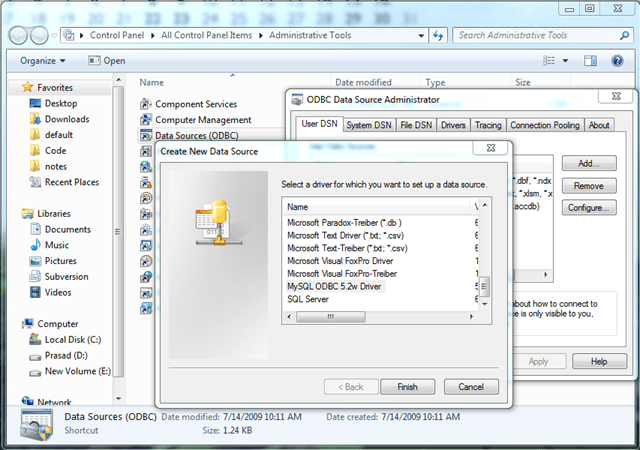
  2. Add an ODBC Driver – You can find this in Control Panel > Administrative Tools > Data Sources (ODBC). Here you will find all the existing ODBC Drivers listed, if you do not see any MySQL drivers listed, click on the Add button on the right hand side. In this list you will find the MySQL ODBC Driver that you had installed from Step 1

    Add ODBC Driver
    Add ODBC Driver
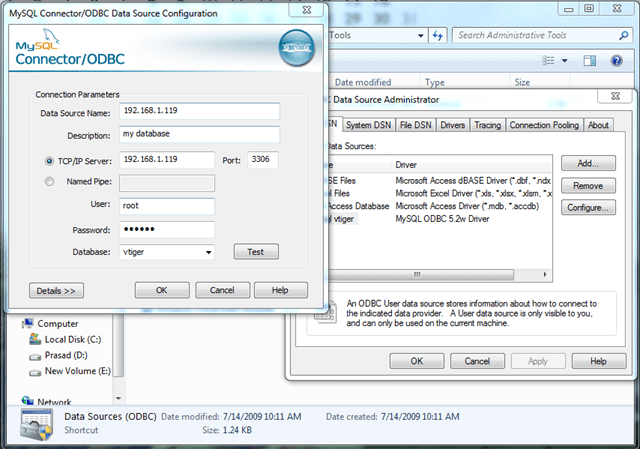
  3. On selecting the MySQL driver, you will be prompted to enter the database details that you wish to connect to. These are your MySQL Database details that you are maintaining on your local network (Pro Tip: Check for connectivity from your machine to the MySQL Server first! I have seen many a programmer waste endless hours trying to connect in vain.)

    Fill MySQL Details
    Fill MySQL Details
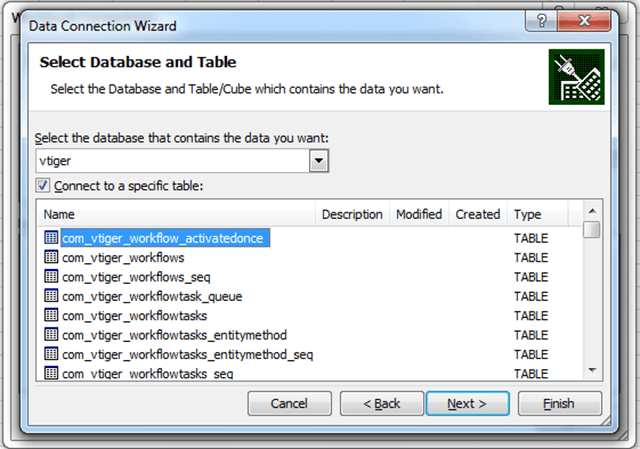
  4. Now you can import one single table from your target DB or you can choose to execute a query and fetch its results. I always prefer the later since then I can retrieve all the data I require in one Data Connection.

    Connecting to a table
    Connecting to a table
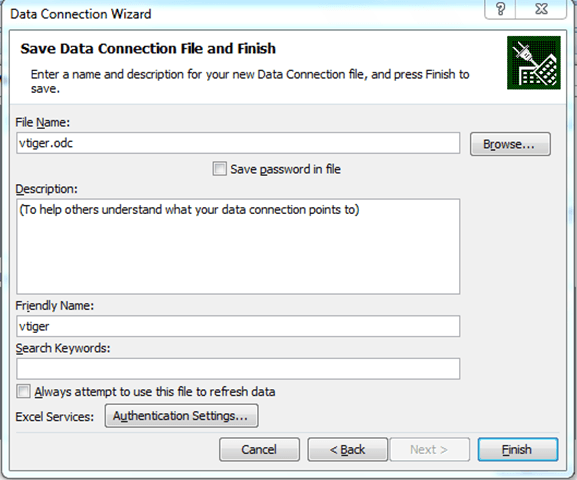
  5. Click on Save and Finish. Your ODBC Connection is ready to be used in Excel!

    Finish Connection
    Finish Connection
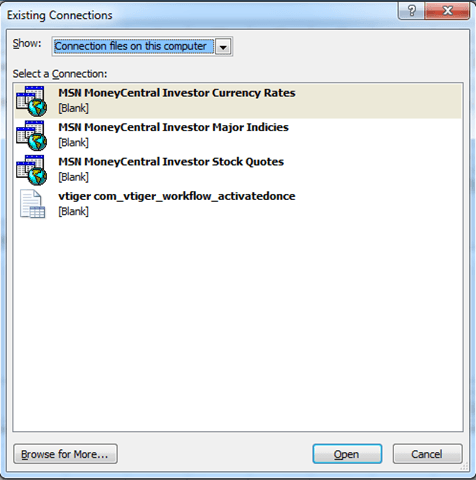
  6. Now open Microsoft Excel and switch to the Data Tab  and click on Connections to see all the data connections already present in the workbook. If it’s an empty workbook, then there will not be any data connections. Click on Add.

    Connection files on this Computer
    Connection files on this Computer
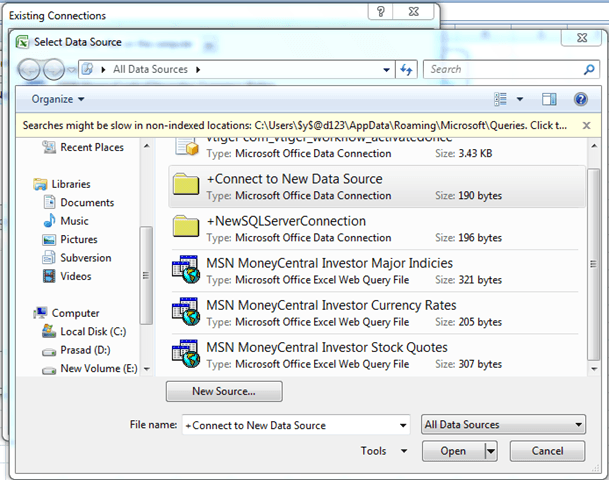
  7. Now your Connections are available in ODBC, so you need to click on Browse and click on the New Source to go to the ODBC Prompt.

    Connect to a new datasource
    Connect to a new datasource
  8. Choose your ODBC Connection and you are done!
  9. Now when you save the connection, Excel will pull the data and display it in your current worksheet! The only thing you need is mad ninja dashboarding skills to make your Excel look awesome!

Typically you would use this system if your dashboard or excel report is pretty much set and the data comes from a database which changes frequently (transaction based database). The only pitfall that I see of this method is that the size of the excel file can really shoot up if you are pulling in a lot of data. Stuff such as pivot tables also work a lot in increasing the excel file size. So try to be frugal in their use when you create a dashboard! The screenshots that I am including are from me connecting our Excel report to our CRM database.


PS – A word of advice, do not directly connect your live database to the Excel file. ALWAYS use a mirror!

Installing WordPress on localhost

WordPress is a fantastic Content Management System, it can be a very simple application to learn for newbies, and it can still deliver the high level of customization that pros typically require. The level of help available across the interwebs for this is also high and it has a thriving developer community. I thought that I would add to the helpful howto’s on WordPress so that a complete newbie can install WordPress on his own machine to give it a whirl.

Here’s a step by step guide on how to install WordPress on your machine –

  1. First ensure you have all the right resources (XAMPP) – This is to ensure that you have a webserver with a MySQL server setup on your machine. Download the setup and install it. It will typically create a folder C:\xampp. Within this folder, make a note of the htdocs folder (this becomes your document root for your local web server). To check whether this has been properly done or not, simply open a browser and type in localhost and see whether you get a welcome page or not!
  2. After setting up your own webserver, you need the WordPress scripts. Download and extract this in your htdocs folder (it should default to a wordpress folder)
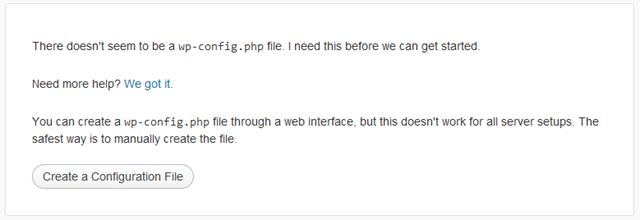
  3. Now simply type in this URL in your browser (http://localhost/wordpress). If you are setting it up for the first time, then you will be prompted to create a configuration file. Wordpress Configuration
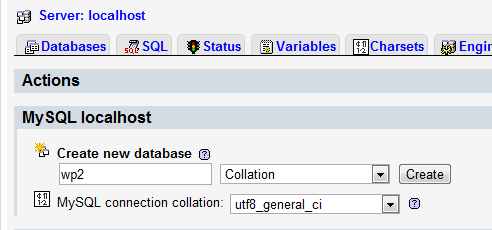
  4. Now remember, for the next step you need to have created the database for WordPress. This is pretty straightforward. Open another link in your browser (http://localhost/phpmyadmin). This will be installed by default if you are using XAMPP. I am creating a database by the name of wp2, here’s how it looks
  5. Creating Database
  6. Now go to the previous browser window and click on the “Create a Configuration File” and proceed to the next step. Enter the following details, (Database – wp2, Username – root, leave the password blank since the default MySQL password for XAMPP is empty! Click on Submit.
  7. All right! You are all set to run the install (a confirmation for this is the Run the Install button!).
  8. The next screen is simple, what do you want to call your site (Site Title – I would always name it test since its on my local machine), username is admin and password also admin. NOTE – On a live webserver, the usernames and passwords will HAVE to be different.
  9. In the end, I always check off the Allow Search Engines to index this site. Its on my local host and I do not want to do unnecessary indexing and pinging to the search engines.
  10. That’s it, now you login with your username and password (in this case it was admin, admin). You should see the Dashboard of WordPress. Congratulations! You have setup WordPress on your localhost successfully!

I hope you found this helpful! In case if you got stuck anywhere in the steps outlined, do let me know, I shall be more than happy to help you out!

Creating a personal blog

Blogger logo

So, a lot of us like to blog, and of course would it not be super cool if we had our own blog url and all the jazz effects at of course a minimal of a cost.

Well, now we can. And even the most basic of a computer user can go ahead and have his personal url blog … here’s how you do it.

  1. Go to a domains seller. I bought mine from Aalphanet. Needless to say, you will have to register first.
  2. Search for an available domain eg- kidakaka.com
  3. If available, go for the kill, purchase it. A .com comes for somewhere around Rs. 450.00 per annum, a .in comes at half the price.
  4. Once that is done, buy the Manage Domain rights for your domain. This costs an additional Rs. 45.00 per year.
  5. Now start a blog on the blogger platform
  6. In the Settings->Publishing->Advanced settings, go to the your own domain name, and provide the same.
  7. The complete instructions are given here, but this is what you do simply –
    1. Enter you domain name in the Advanced tab
    2. In your Manage DNS section of domain dashboard, make a CNAME entry for your domain to point to ghs.google.com
  8. It should take an hour and two and Voila!!

The blog now is hosted on the blogger platform, but the url is yours. A customized personal blog for less than Rs. 500.00 a year.