Posted

GPT-3 (short for “Generative Pre-trained Transformer 3”) is a language generation model developed by OpenAI. It has the ability to generate human-like text, which means it could potentially be used for a variety of purposes, including inbound marketing. However, it’s important to note that GPT-3 is still a tool, and its effectiveness in any given situation will depend on how it is used.

One potential use of GPT-3 in inbound marketing is to generate chatbot responses. Chatbots are automated programs that can communicate with customers through chat or messaging apps. They are often used to provide quick, convenient responses to customer inquiries or to help guide customers through a process, such as making a purchase.

With GPT-3, it’s possible to train a chatbot to generate more natural, human-like responses to customer inquiries. This could make the chatbot more effective at providing helpful information and improving the customer experience. It could also help to improve the overall efficiency of inbound marketing efforts by allowing businesses to handle a larger volume of customer interactions.

However, it’s important to note that GPT-3 is not a replacement for human interaction. While it can generate human-like text, it is not able to fully replicate the nuance and depth of understanding that a human can bring to a conversation. In addition, it’s important for businesses to carefully consider the ethical implications of using AI-powered chatbots and to be transparent with customers about the fact that they are interacting with a machine.

Overall, GPT-3 has the potential to be a useful tool for inbound marketing, but it should be used thoughtfully and with the appropriate safeguards in place.

Safeguards to consider

When using GPT-3 (or any other AI tool) for inbound marketing, there are a few key safeguards that you should keep in place to ensure that you are using the tool ethically and effectively:

  • Be transparent: Make it clear to customers that they are interacting with a chatbot or AI-powered tool, rather than a human. This will help to avoid misunderstandings and ensure that customers are aware of the limitations of the tool.
  • Set clear boundaries: Define the specific tasks that the chatbot will be responsible for, and make sure that it is not able to engage in inappropriate or sensitive conversations.
  • Monitor and review: Regularly review the chatbot’s responses to ensure that they are accurate, appropriate, and helpful. This will help to identify any potential issues or areas for improvement.
  • Seek feedback: Ask customers for their feedback on their experience with the chatbot, and use this feedback to make any necessary adjustments to improve the customer experience.
  • Stay up to date: Keep up with developments in AI and chatbot technology, and be mindful of any ethical concerns or best practices that may emerge.

By following these safeguards, you can ensure that you are using GPT-3 (or any other AI tool) in a responsible and effective way to support your inbound marketing efforts.

Conclusion

In conclusion, GPT-3 is a powerful language generation model developed by OpenAI that has the potential to be used for a variety of purposes, including in inbound marketing. It can generate human-like text, which means it could potentially be used to improve the efficiency and effectiveness of chatbots and other AI-powered customer service tools. However, it’s important to use GPT-3 (or any other AI tool) thoughtfully and with appropriate safeguards in place, including being transparent with customers, setting clear boundaries for the tool, regularly reviewing and monitoring its responses, seeking feedback from customers, and staying up to date on developments in AI and chatbot technology.

PS – This entire article was generated by ChatGPT. Not a single word in this is mine. Enough said.

Author
Categories Business, Technology

Posted

Those of you who are running some sort of a content management system (CMS) for your websites would be familiar with the problem of improving the site loading speed through different methods. From the age old caching methods of using op cache module, to using an application specific caching method such as WP-Supercache for your WordPress installations, the sheer variety of solutions out there is a lot.

For a non-tech webmaster (these days, this term seems like a conundrum!), it becomes difficult to choose. At the end of the day, what one ends up going for is how fast the website is loading and more importantly how is the web performance of the site.

Let’s take a look at what are some of the common factors that any webmaster would like at for their caching solution.

Server site rendering time

This is effectively how fast is your server giving the response on the browser. Let’s say that you are running a blog on a small instance or a shared hosting solution. This would usually have limited resources associated with it, be it computing or memory. For instance, currently, these pages are being served off a 512 MB droplet.

Needless to say as your traffic increases, these limited resources are then not enough to address the entire traffic and thus, the response time for all your visitors starts to increase. A simple solution for these problems could be to bump up the hardware and increase the computing and memory being made available for the server. The computing speed is obvious, but why the memory you might ask? Well, since most web servers are softwares running on servers (for e.g Apache or Nginx are the servers most commonly used for WordPress), these software processes have to run on the server. The more the traffic, the more the number of processes.

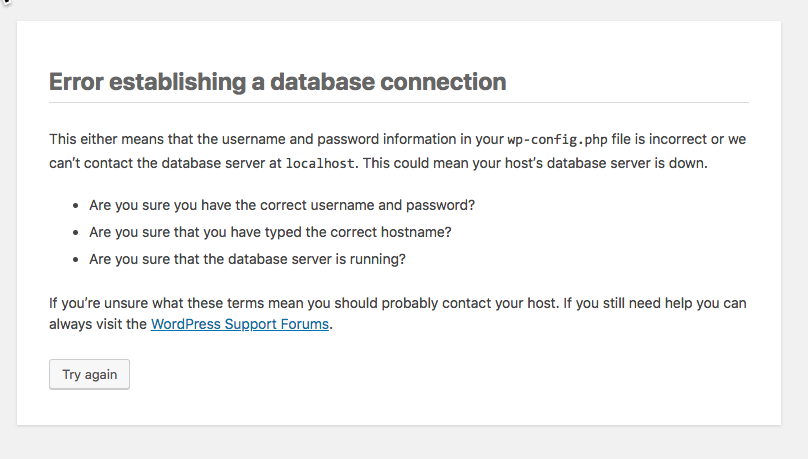
If you are running WordPress and are facing a load of traffic, and if you are running your database on the same server, then you might sometimes be seeing images like the one below –
MySQL error with WordPress

Seems familiar? A common reason for this is when there are too many apache2 processes and not enough memory to handle all of them. The server promptly terminates the other processes, including the MySQL daemon.

Caching to the rescue

This is where server side caching comes to the rescue. Take this blog post for instance. How many times in the week am I going to edit this? Not many right?

In which case, instead of the PHP script executing every time, why can I not serve the static (HTML pre-rendered) version of this post?

WP-Supercache does a good job as a plugin to do this, however, in this case, for supercache to execute, the WordPress PHP scripts are still executing. How can we stop those?

Another option would be to run caching at Apache or Nginx’s level. This is a much better approach since instead of calling PHP scripts, the server will serve the last known cached static file. The problem with this approach is cache management and storage.

With a small server, you may not have a lot of storage, and if you have been maintaining a content heavy site, then caching all pages might be a storage intensive process. The expectation from your instance’s compute power also increases.

This is where you will find reverse proxy servers shining.

Reverse proxy servers

A reverse proxy server is a server that sits in front of the web servers and forwards client requests. One of the older versions for PHP based websites was Varnish. Nginx also offers this, and newer versions of Apache also do offer this functionality.

What the reverse proxy does is for each request, it caches the response from the down stream server and serves that response for each subsequent request. Think of it as a smart cache manager that sites seamlessly between your CMS and the user.

Traditionally, these were a bit difficult to setup, and therefore were the domain of only the tech oriented webmasters. However, of late, there have been a couple of smart SasS based reverse proxies, and that’s what I wanted to write about.
Cloud-based reverse proxies

A cloud based reverse proxy is a reverse proxy server that’s not on your network/server infrastructure, but rather hosted as a separate service that you choose to buy.

I had initially tried Cloudflare, but wasn’t really impressed with the results. There were a couple of Indian service providers as well, but the outcome wasn’t that great.

Then, one of my colleagues pointed me to Nitropack. Getting started with Nitropack was a breeze and I could easily set this up. There was also a plugin to be installed in my WordPress setup and that’s about it. Nitropack even had a CloudFlare integration (since I manage my DNS on CloudFlare), where it made the relevent DNS entries and I was able to use this without too much of a hassle.

I am currently on the free plan, but the immediate impact on my server response times, and my web performance has been substantial.

If you are a website owner and if you have been harangued with web performance issues, do give this solution a try. It makes a sufficient impact on your response times.

Author
Categories Web, Technology

Posted

Back in 2017-18, I started teaching a course in a business school – instead of including a lot of theoretical frameworks, I opted to go with the basics and some implementation and tooling concepts. One of the tools that I chose to teach was how to use R in business analytics.

For those of you who do not know R, here is a helpful wiki article on the same.

Teaching what is broadly a scripting language to graduate students who havent written a single line of code is a humbling experience. You cannot take concepts such as variables, control loops, libraries as taken for granted since the exposure to these has been minimal. So how does one pack all that information into simple, usable instructions?

This is what I did.

Use free MOOCs

For students to understand the basic concepts of R – vectors, assignments, matrix, simple functions, etc, I prefer free MOOC such as the Introduction to R by Datacamp. The course is simple, it has the R ide within the practice area and allows for easy practice sessions and a playground to test your scripts while you are reading through the course material. I find this super useful for application oriented courses.

Right before jumping into the actual concepts of how R can be used for business analysis, this basic introduction course helps in establish a good solid base for participants who want to get started with R.

Use multiple datasets

I typically start these sessions with a financial data set. Credit card usage statistics, or some such information. However, I realized that students do better if they are able to relate to the date. During the length of the course, I found that switching to a course such as movie data (and thanks to IMDB for opening up their database) or cricket data made a lot more sense. It became easier for the participants to apply conceptual learning on the data sets.
See and Do

We used to incorporate several practice sessions in the class. This included getting the basics, writing scripts and getting started with R.

Some of the easier ways are –

Author
Categories Web, Analytics

Posted

Disclaimer – This is going to be a slightly technical post. If code scares you, then I’d suggest you skip this one. However, if data excites you, read on fellow adventurer!

When Google launched Google Data Studio, I had written an in-depth post about how one can create dashboards in Data Studio and some of the easy to use dashboard templates that Data Studio has to offer. As the product evolved, one of the most powerful features that this product had to offer was the ability to create custom data connectors to your own datasets.

What does a custom connector do?

A custom connector enables a user to access their own data source within Google Data Studio. Let’s take an example of a marketing research associate who wants to present her findings. One approach she could use would be to put all that data in Google Sheets, and then use one of the in-built connectors.

However, what would she do if her data set was large and does not fit in Google Sheet or Excel? Or if her data set included multiple surveys which are inter-related to each other?

What if this data was in a database, or available as an API? This is where the custom connector for Google Data Studio works.

I wrote my first connector a year back, and I had to do some digging around. I thought that I should pen down my notes so that more people can do this much more easily. Here are my notes for the same.

Building a custom connector

Before you jump into the implementation bit, know that this is based in JavaScript and you need to be comfortable with Google App Scripts. It’s okay if you do not know this, but JavaScript is a must.

Google has official documentation on the developer site of how to build a Community Connector, this is a pretty good resource to start. It has a step by step video and instruction guide as well.

Let’s look into what makes different parts of a connector, here is a link to a sample connector code on Github.

Community Connector sections

Each community connector is a separate Google Apps script that you deploy using Google App scripts. The connector is in itself made of the following sections –

  • Configuration section – This is to flesh out all the meta information about the community connector. Use this section to take any inputs from the user e.g API Secret and key if you don’t wish to store this in your code.
  • Authentication section – This is to authorize the app script. If your data is lying behind a secure mechanism, then use this section to authorize the script to access the data. This supports OAuth2 as well.
  • Schema section – This is used to define the structure to the data you are importing into Data Studio. Use this section to outline which fields and what data types are they. You can also add more information on what kind of aggregation do you want this field to be have (Sum, Average, Min, Max, etc).
  • Data section – This section is used to fetch the data that you are importing. Use this section for data validations or if you want to do any last minute data tweaks (e.g date conversions from string to date).

That’s all there is to it. Now, let us get into the actual flow of the script.

Connector code flow

When you are writing your connector, be sure to go through the developer reference first. In your script, you will have to include the following functions –

  • getConfig() – this returns the configurable user options for the connector, this will be shown to the user when the user is adding the connector to their Google Data Studio accounts.
  • getAuthType() – this is the function which is used to check if any authentication is required. If OAuth is set, then the community connector interface would check for the OAuth details
  • getSchema() – this returns the schema of the data that is being access, this will be shown to the user when the data is being explored (where we can see the dimensions and metrics).
  • getData() – this is the function which is used to access the data, the data format that is expected is outlined here. Normally, it is advised that the programmer write a separate function for fetching the data, a post processing function for setting up the return values, and finally call those in the correct order in this function.

Do note, that these functions will be called in the same order as they are listed. As long as you have these functions in your code, you have a functioning connector. Once you have this, you will have to deploy the code.

That’s it. Now, add this community connector to your Google Data Studio account, and make the reports you want to!

Author
Categories Analytics, Web

Posted

In a move to bolster real estate sales, the Maharashtra government has announced a reduction in stamp duty rates of up to 2-3%.

As a new home buyer, this is an opinionated piece and somewhat of a warped perspective. However, I will try to be as objective as possible and hope to give enough citations to qualify my stance.

What is stamp duty?

Stamp duty is the additional charge that you will have to pay if you are buying a home anywhere in India. Depending on the state you are in, this stamp duty is payable at different stages in the home buying journey.

In Maharashtra, the stamp duty is to be paid upfront when you are doing the home down payment. In other states, such as Karnataka or Telangana (I am mentioning these because these are the two fastest growing states in terms of real estate) this stamp duty is to be paid on possession.

Why is this so important?

Well, most people end up saving for buying their first homes. Unless if you have access to super awesome payment plans and offers such as the home down payment assistance of HomeCapital, the majority of their savings end up being spent for buying that first home.

A stamp duty is usually levied on top of the agreement value. So in Maharashtra whenever you buy a home, not only will you be paying the usual 5% GST, you will also have to pay a 5% stamp duty as well. This pretty much puts the cost of the home at 110% of the agreement value. This is not even factoring in the cost of the broker, the registration fees, the home loan processing fees. If you add that up, the cost of the home is often 115% of the agreement value.

Stamp duty is 30% of this chunk. This chunk of expense is usually not visible to the average home buyer, until the point of purchase. That means you realize that you have incur additional expenses when you commit to buying a home.

Reducing this stamp duty from it’s 5% to 2-3%, the Maharashtra government has reduced the overheads of home buying.

So … what is the actual impact?

This is the question that a lot of us are asking. The actual impact if you are purchasing a home anywhere in Maharashtra, is a 60% reduction in stamp duty (that’s 2-3% of the agreement value). So, if you were to purchase a home worth 1Cr INR (roughly USD 140,000), then the net benefit you are getting is 2-3 Lakhs INR (roughly USD 3000-4000).

Would this impact real estate sales in the long term? No. In the larger scheme of things, this is but a drop in the ocean that’s not the painful part. In the smaller scheme of things, there might be some speculator transactions hoping to cash in on the “opportunity”.

Having just finished the worst quarter in the last 20 years, the sales are bound to rise. As the industry slowly recovers to its pre-COVID numbers, this small respite is a precisely that. It’s a small reprieve and pretty much nothing else. After 10 years, no one will remember this move, however, if this move were to solidify into the norm … then this would be interesting to see.

Conclusion

I think the government needs to look at the larger issues of access to affordable capital. Granting a small reprieve is not really an incentive to the industry.

The short term transaction upheavals would be an issue, and this hurts the same industry more than actually helping. However, most state governments have historically shown to be myopic and short sighted .. due to the nature of their terms and I cannot really fault them for this. So, like all things in the past 4 years, this shall also pass.

Author
Categories Work, Business